Tuesday, June 2, 2009

BLACK BALLET FLATS

I find it interesting that I see as many pairs of black ballet flats for women out and about in the stores as well as on many pairs of rapidly moving feet as late as the week after Memorial Day. In fact, far too flats are roaming about for the excuse that busy moms rushing out the door just slipped them on for lack of a more conveniently located or lighter colored pair of thongs or sandals.

steve madden black ballet flats black and white polka dot

Go Here to See More


Even celebrity moms who probably have an assistant or wardrobe organizer to put their outfits together are still looking sharp and sophisticated in black. For instance, just this week Katie Holmes and darling daughter Suri Cruise were on a shopping excursion at the Grove in LA and Katie’s choice of footwear was, you guessed it, black ballet flats. Baby Suri’s pretty toes were covered with a pair of pink ballet flats so the pastels, white or even lilac flats have yet to be nudged out of the running for late spring and early summer. But frugal fashion divas will be happy to hear that they will get more than one season’s use out of their black ballet flats.

WHICH FLATS are FASHIONABLE?

At the time of this article, women with an ample budget for shoes are buying up black Chanel ballet flats like winter was just around the corner. Other favorites are the gathered ballet flat regardless of the brand, the easy clean, easy wash Crocs that are so comfortable and cute and Steve Madden’s black ballet flats, Facade.

GATHERED, PLAIN or BUCKLES and BOWS

What would the fashion industry be if they were not consistently reinventing the wheel? It would be completely out of character for them to consider the style of plain, black ballerina flats too good to improve. First, they add tiny heels, then gather the toes or add a belt across the tip of the toe with a brass or silver buckle. One of my favorites is the black ballet flat that allows that little peek of toe cleavage. It’s my opinion that this does for flat shoes what peep toes does for pumps. It takes a basic design and transforms it into something sexy and alluring. And who would have ever thought we could have that and the comfort of flats in one neat little package?

Return to Celebrity News, Purses, Makeup and Black Ballet Flats and Shoes to get more information on what the stars are wearing.

Saturday, March 7, 2009

HOT PINK PUMPS - HEELS for SPRING


Kate Spade - Clarice (Hot Pink Satin) - Footwear


Daylight savings time is ending and we need the latest hot pink pumps to compete with the blazing abundance of blooming azaleas. You can just bet that even my favorite Pride of Mobile is not going to outshine the hot pink heels that I have in mind.

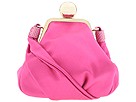
Kate Spade - Spring Island Kaylee (Hot Pink) - Bags and Luggage


The first day of spring is a teaser that sends me out to try on strappy sandals even though I know there are several months yet to come with temperatures that require my toes to be covered or at the most peep out from under the glove soft leather of my shoes. Not to mention that we still have April showers to consider when peep toe shoes with even the tiniest sliver of pretty pedicure showing could mean suffering through a meal with soaking wet feet. I'm willing to sacrifice my personal comfort for sexy feet, but not when it could bring on a nasty case of pneumonia.

My idea of the perfect hot pink pumps for early spring do their magic for my legs and feet with sparkling rhinestones, ribbons and heels. Save the hot pink heels with straps and peep toes for later in the year. My favorite shoes for braving late spring chill and dampness completely enclose my pretty toes and showcase my legs to full potential as only spike heel pumps can do.

Fuchsia is without a doubt a favorite of the woman who is not afraid of being noticed. My full hips keep me from filling my closet with hot pink dresses and pants. I restrict the use of bright pink to the smaller parts of my body; my fingernails, my toes and my Kate Spade pink leather shoes, totes and purse.

Return to Celebrity News, Purses, Shoes and Makeup Tips to see more styles and recommendations on how they should be worn.

DIY EYEBROW SHAPING

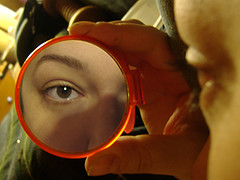
eyebrow shaping


After a professional eyebrow shaping (whether they are waxed threaded or plucked) in about four weeks the hair will have grown back and you will need to repeat the process. And in that four weeks there may be a few stragglers that threaten to compromise the perfectly shaped eyebrows that frame your face in such an attractive fashion.

To keep your eyebrows looking neat in between visits to the salon, here are a few tips to maintain your brows until the next eyebrow shaping session. I do not recommend changing the shape of your eyebrows yourself. These tips are simply to preserve for the shape of your eyebrows that your cosmetician considered to be perfect for the shape of your face.

To maintain the arch of your brows, you need only a pair of tweezers and the bathroom mirror. You can use your magnifying makeup mirror, but resist the urge to pluck inside the main shape. Identify the strays that are springing up under the arch and outside the boundaries set by your professional and remove them by plucking them out in the direction they are growing. This DIY eyebrow shaping session should be done well in advance of public appearances as some redness may occur.

After you have removed stray hairs, fill the main shape of the eyebrow in using a matching pencil and set with eyebrow gel. Many eyebrow pencils now come with a kit that includes a small brow brush and gel.

Following this procedure on a weekly basis will keep the professional wax and tweeze looking great. In fact they may look so much like they’ve been professionally done in the salon that you may want to do your own eyebrow shaping from now on!

Return to Celebrity News, Makeup Tips, Purses, Shoes and Fashion to see more information on do it yourself beauty treatments.

Monday, February 23, 2009

CHANEL SUNGLASSES


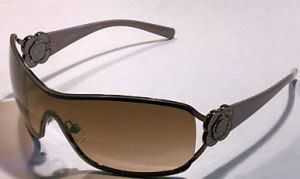
Chanel sunglasses Flower logo sunglasses

See More Here


If I get a tax refund this year, I'm going to buy a pair of Chanel sunglasses for yours truly. I have been dying for some Chanel flower logo sunglasses even through the months when the sun wasn’t strong enough to bring on even as much as a tiny bit of a squint.

I’m using the 100% UV protection to justify my purchase. Beyond that the only reason behind coughing up the cash for authentic Chanel sunglasses is pure fashion frenzy and vanity of course.

And to give you an answer to that unasked question; no I’m not willing to settle for fake Chanel sunglasses. There are several reasons that I feel that buying designer imitations. I must confess that I have bought a few knockoffs in my day and a few were alright. But in the long run only the genuine pieces truly made me truly happy. I would rather have fewer items in my wardrobe of glasses and have the pleasure of wearing authentic Chanel sunglasses
.

There are several styles that I have my eye on this season. One is the Model Number 4164B with a brown frame and brown gradient lenses. They have flowers on each temple sprinkled with tiny rhinestones that form the Chanel logo. The other pair I’m considering is the Chanel Aviator sunglasses that have similar rhinestones (or are they Swarovski crystals?). If I seem hung up on the rhinestones it’s because I tried on a pair of the Chanel flower sunglasses and the Chanel Aviator embellished sunglasses and they just frame a girl’s face to perfection.

Those are just two models that I’m lusting after at the moment. There’s no way I can afford two pairs of Chanel sunglasses, but I can dream can’t I?

If all goes well I may find my dream glasses on EBay at a discount. Don’t worry, I’m careful and never buy without checking out the seller and requiring all documentation of authenticity.

Which pair do you like best? The flower sunglasses or the big Chanel sunglasses in the aviator style?

Return to Celebrity News, Purses, Makeup and Shoes for more recommendations on what the stars are wearing this season.

Thursday, February 19, 2009

KEEPING YOUR MANICURE and PEDICURE PRETTY

How your manicure and pedicure are performed as well as the color nail polish you choose all play a part in keeping your nails looking good as long as possible. Even if you know how to do a manicure and pedicure at home that just costs a few dollars but looks just like you spent a bundle at the salon there is the time spent to consider.

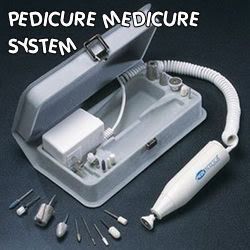
manicure and pedicure kit

Go Here to See More


LONG LASTING POLISH

There are times when nothing less than long, dramatic fingernails will do. But for everyday, you will get more mileage out of a light color than dark red. Every little nick and chip that is oh so visible on a darkly painted nail hardly shows on a shade that is as close to the color of the natural nail bed as you can be happy with.


PUSH DON’T CUT!

Cuticles that are snipped rather than gently pushed back tend to look ragged quickly. So, tell your technician to limit the clippers to major shape changes for your nails and to use the orange wood stick for your cuticles. Then it’s up to you to regularly apply cuticle minimizer cream to eliminate the dead cuticle cells.
Some cuticle creams that have gotten positive reviews are:
  • Butter London Melt Away Cuticle Eliminator
  • Burt's Bees Lemon Butter Cuticle Cream
  • L'OCCITANE SHEA BUTTER CUTICLE & Nail Cream
TOP IT OFF Any chips that become visible can be camouflaged with a touchup from a neutral color polish pen. Again, light shades are easier to manage as a perfect match isn’t going to be as crucial as it might be with dark colors. Add a layer of clear topcoat and your manicure and pedicure will last a bit longer. MOISTURIZE
Even the most meticulously maintained manicure and pedicure can’t make rough, dry skin look good. The key is to moisturize those hands and feet. Exfoliate your rosy toes in the shower with a foot file and follow up with a cream immediately upon leaving the tub. Scrubs are not recommended because they wreak havoc on the shine of your topcoat.
Anything worth having is worth the extra effort to maintain and when it comes to personal appearance, the benefits of a neat manicure and pedicure are endless.

Tuesday, February 10, 2009

HOW TO DO A MANICURE and PEDICURE AT HOME – DIY MANICURE and PEDICURE INSTRUCTIONS

Not so long ago did you imagine that you’d ever need to know how to do a manicure and pedicure at home? Well, what goes up has a nasty habit of going right back down and the key to not having ugly nails in those months when your budget is stressed is to learn how to a polished (if you’ll forgive the pun), professional DIY manicure and pedicure.

Go Here to See More


Shop at a beauty supply store to get top of the line manicure supplies for the best results or your DIY manicure may waste more money than it saves. The money that you spend for top quality nail clippers, polish and files is an excellent investment even if the prices are more expensive than what they cost at the local discount store.


Here’s a basic supply list:
  • A large bowl that is big enough for your hands to fit inside and heavy enough not to tip over easily that’s been filled with warm water, soap (I like to use my favorite body wash but it’s your choice)
  • Cotton makeup remover pads or large cotton balls. Don't waste money on small skimpy cotton balls as you will just end up using more. Starting off with big ones will save you time.
  • Nail polish remover with or without acetone
  • Orange wood cuticle sticks and cuticle cream
  • High-quality hand cream
  • Nail clippers and toenail clippers (I never use my nail clippers for my toenails or vice versa)
  • Nail files
  • Nail polishes including base coat, color coat and top coat
  • Terrycloth hand towels and paper towels
TIPS: In my experience the best time to do a manicure and pedicure at home is immediately following a bath after you have exfoliated both your hands and feet. It’s considered fashionable at the time of these instructions on how to do a manicure and pedicure at home to match your fingernail polish and toenail polish. Of course fashion trends have a way of changing in the blink of an eye. Once you have your bowl of warm water and soap and your manicure supplies arranged on the table where you will be working you are ready to start. Step One. After washing your hands with soap and water to remove all lotions and oils, you will then remove all of the old nail polish from your fingernails for a fresh start. Once the old polishes removed wash your hands once again to remove the finger nail polish remover. Step Two. Shape your nails using the nail clippers or the fingernail file depending on whether you need to reduce the length or just smooth rough edges. When using your fingernail file he will start at the outer edge and smooth across the middle in one motion. Never saw a back-and-forth as this will weaken your nails and make them prone to splitting. Step Three. Soak your hands in your bowl of warm water for around five minutes. Step Four. After soaking, dry your hands with a cotton towel. Step Five. Place a small amount of cuticle cream on each of your fingernails and massage it into your cuticles Step Six. It’s not a good idea to clip your cuticles because of the danger of infection. Instead use your Orange wood cuticle stick to gently push your cuticles back and shape them. Step Seven. At this stage, some instructions on how to do a manicure and pedicure at home recommend that at this time your should rinse your hands and apply a coat of your moisturizing hand cream and wait five minutes before wiping away the excess. I disagree with this as there may be some cream left on your fingernails resulting in failure of the base coat to adhere to the fingernail. Try it both ways and make a decision as to what works for you. Step Eight. Upon a layer of base coat to each fingernail and allow to dry completely before moving onto the next step. Step Nine. Apply one layer up your color coat of polish and allow it to dry completely. Step Ten. Apply a second layer of color coat and allow it to dry completely Step Eleven. When you are certain that all layers are completely dry (the longer you wait the better the results and less chance of smudging) you can then put the finishing touches on your DIY manicure with top coat. This is my favorite step in how to do a manicure and pedicure at home because it’s what gives your fingernails that deep, gleaming polished look. DIY PEDICURE INSTRUCTIONS Step One. Exfoliate your feet by scrubbing and using a pumice stone on your heels and any calluses you may have. Step Two. Some instructions for how to do a manicure and pedicure at home recommend at this point to apply moisturizer but I disagree with this recommendation cause of residual oils being left on the nails that may prevent your polish from lasting as well as it might when applied to a clean oil free nail. Step Three. Shape your toenails using your toenail clippers and then smoothed them using a file. Step Four. Massage cuticle cream into the cuticles and use your orange wood stick to gently press them back using the lightest pressure possible to avoid damage to the nail bed. Step Five. Rinse feet making sure that all cuticle creams or moisturizer if you chose to use one has been removed Here’s the fun part in how to do a manicure and pedicure at home; assume the toenail painting position which is which is sitting with your knee pulled tightly to your chest with one hand holding the toenail that you are polishing while the other hand applies polish. Step Six. Using toe separators, tightly wadded up Kleenex or cotton balls separate your toes to avoid smudging from one toe to the next. Repeat Steps Eight through Eleven of the DIY manicure instructions. Return to Celebrity News, Purses, Makeup and Shoes to see more tips on DIY manicures and pedicures and intructions for how to do a manicure and pedicure at home with professional results.

Monday, February 9, 2009

Jumpsuits – Styles for Every Woman - Are they Right for You?

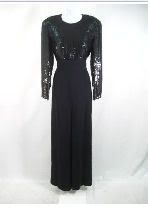
jumpsuit by escada


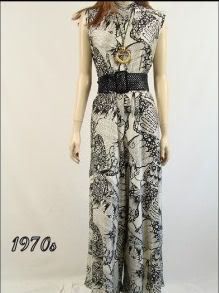
Are jumpsuits for the woman who wants to jump in, shall we say, to the latest fashion? They are certainly making a comeback this season in styles that are not the kind seen in the late 80s and early 90s that were designed with tapered legs that belonged on a pair of cigarette pants. The vintage 1970s version is closer even though the wide legs were known unflatteringly as "elephant legs" in the days of disco.


vintage 1970s jumpsuit


Even with the forgiving profile, jumpsuits the leading and are not for every woman. The ones that reflect the clothing trends of the moment are geared toward women with height to spare and a spare shape to boot. Meaning that if you have some extra junk in the trunk or blessed with a busty bosom that this article of clothing may not be the best choice to camouflage your figure flaws no matter how minor they may be.

If you truly believe that your body is long, lean and leggy enough to wear jumpsuits you should still take precautions to insure that you look your best. Here are a few tips for selecting a jumpsuit that will enhance your figure and minimize the effect it has on your clothing budget.

1.If you are of average height, skip the flowers and polka dots and buy a jumpsuit in a dark color that will make you look thin. Only members of the tree top club look super in the vintage jumpsuits of the 70s with psychedelic flowers and paisley patterns and a wide leather or stretch belt at the waist.

2.Pick a belted style or one that has darts that shapes the waist.

3.To make an easy transition from work to play, a jumpsuit with a jacket can hide a halter style top or plunging back from 8 to 5 and then disappear to wear to a cocktail party.

A pretty pair of strappy sandals in the same shade as your outfit will give you additional height, extend the length of your already long and luscious legs and show off your pretty toes that are polished to perfection.

THE COST

Expect to pay upwards of $300 for a stylish new jumpsuit. However, a woman who has her heart set on a pretty black, sequin or beaded number with a tight budget might be able to pick up something trendy at a fourth of that price in an online auction. Even at that price, you should remember that these contraptions are not as versatile as a pair of pants. You won’t be able to wear them repeatedly without notice nor are they candidates for mixing and matching with separates.

So, there you have the details on how to shop for the best jumpsuit for your needs as well as criteria on whether one will work with your personal body type.


Return to Celebrity News, Purses, Makeup and Shoes to see more spring fashion and clothing trends for women.

Friday, January 30, 2009

MILEY CYRUS in SANDALS

This picture of Miley Cyrus in sandals that put her pretty feet and legs on display has opened up a line of discussion on the brand of the gray above the knee dress she was wearing, what her shoe size happens to be as well as where we can find the sunglasses in the picture.

Photobucket


The black BCBG sandals are called the GIANNI LACE-UP STRAPPY SANDAL and were originally offered at the price of $240.00, but are now on sale at a deep discount. So if you feel that you can't live another minute without these cage or modified gladiator style sandals, now may be the time to pick them up while they are for sale at an affordable price; for designer sandals at least.

High heel strappy sandals with an exotic, bohemian look are all the rage. You must admit that these are very attractive (and would have looked even nicer with painted toenails) even with an extreme number of straps wrapping the arch of the foot and the closed heel.

Return to Celebrity News, Purses, Makeup and Shoes to see more pictures of your favorite stars and what they are wearing.

miley cyrus